
Capture Type Function Block: Stop and Trigger Tab
Overview
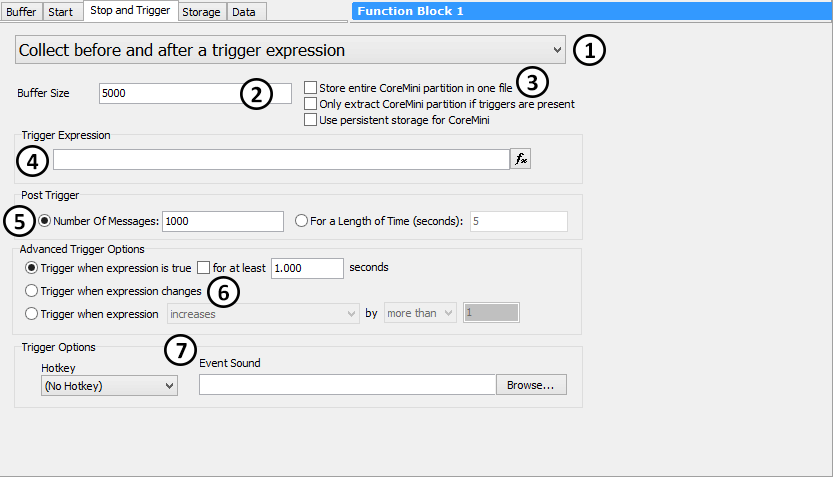
Collection Method
This drop-down box (Figure 1:![]() ) is the most important setting for any capture block, as it determines its basic behavior. Table 1 summarizes the five collection methods, and also shows which sets of parameters are enabled for each method.
) is the most important setting for any capture block, as it determines its basic behavior. Table 1 summarizes the five collection methods, and also shows which sets of parameters are enabled for each method.
![]()
![]()
![]()
![]()
![]()
![]()
![]()
![]()
![]()
![]()
![]()
![]()
![]()
![]()
![]()
![]()
Buffer Size
This box (Figure 1:![]() ) specifies the number of messages to be captured in the buffer. It is present for all collection methods except for Stop on expression (which doesn't use a fixed buffer size). For trigger-based methods, the data in this buffer is conceptually split into the pre-trigger buffer and post-trigger buffer sections, as described below.
) specifies the number of messages to be captured in the buffer. It is present for all collection methods except for Stop on expression (which doesn't use a fixed buffer size). For trigger-based methods, the data in this buffer is conceptually split into the pre-trigger buffer and post-trigger buffer sections, as described below.
CoreMini Options
These three options (Figure 1:![]() ), which are present for all collection methods, configure capture block operation for CoreMini standalone logging:
), which are present for all collection methods, configure capture block operation for CoreMini standalone logging:
Trigger Expression
This option appears for the two collection methods that are dependent on an expression being evaluated (Figure 1:![]() ). Press the
). Press the ![]() button to open the Expression Builder, where you can define the trigger expression.
button to open the Expression Builder, where you can define the trigger expression.
Post Trigger Options
For collection methods where data is collected both before and after a trigger, this area is where we specify what should be done after the trigger occurs (Figure 1:![]() ). There are two main options here:
). There are two main options here:
Advanced Trigger Options
The Collect before and after a trigger expression collection method offers additional options (Figure 1:![]() ) for determining how Vehicle Spy determines that a triggering event has occurred:
) for determining how Vehicle Spy determines that a triggering event has occurred:
Trigger (Control and Notification) Options
These settings (Figure 1:![]() ) provide additional input and output options for trigger-based collection:
) provide additional input and output options for trigger-based collection: