Script Type Function Block Commands: If, Else, Else If, End If
Overview
The If, Else, Else If and End If commands are used to implement control logic structures within Function Block scripts. They are designed to work together to allow you to precisely manage what your script does based on signal values or events.
If you have a background in programming, you are likely familiar with these commands, and they behave in much the same way that you would expect them to. For reference, the commands are fully described individually below.
If Command
Each logical control structure must begin with an If command. The Value parameter for this command is a conditional expression set up using the Expression Builder, and can be anything that returns a True or False value. Depending on this result, Vehicle Spy acts as follows:
If the expression evaluates as True, then all commands following the If statement are executed, up until the next matching Else If, Else or End If statement.
If the expression evaluates as False, then all commands following the If statement are skipped, up until the next matching Else If, Else or End If statement is seen.
Normally a conditional expression returns a value of 1 for True, or 0 for False. If a numeric value is returned other than 0 or 1, it will also be considered True.
Else Command
Delimits the commands executed when an If or Else If statement is True, and begins those executed when the preceding If or Else If is False.
The Else statement can be used just with an If and End If to provide simple "either-or" logic, or with Else If commands to allow multiple conditions to be tested. When used with Else If, the Else command usually appears last, and the commands after it are run only if all preceding If and Else If statements evaluate as False (see example below).
The Else command has no Value parameters.
Only one Else command should appear in a single If / End If control structure.
Else If Command
This command combines an Else and If statement. It marks the end of the commands executed in a preceding If or Else If block, like an Else command does, but it also starts a new set of commands to be executed if the condition specified in the Value field is true.
Multiple Else If commands can be used, and they can be used with or without an Elsecommand. This is commonly done to allow a different action to be taken for each of a variety of values in a signal.
End If Command
This command ends a logical control structure. A single End Ifcommand must appear in the script to match each If command, irrespective of the number of Else or Else If statements that may be present.
The End If command has no parameters.
Nesting Control Structures
It is possible to create more complex logic in a function block by nesting control structures, which means putting an If / Else / Else If / End If structure within another one. All the rules above must be followed for each structure.
By default, Vehicle Spy will associate Else,Else If and End If commands with the most recent (innermost-nested) control structure. It will indent the commands to make it easier for you to keep the structures separate and understand the control logic you have created.
Examples
Below are a few examples showing typical uses of these commands.
If / End If
This is the simplest structure, executing one or more commands if an expression is true. The example in Figure 1 tests if a Message Selector signal equals 1, and if so, it transmitsTx Message 1; otherwise, it does nothing, and execution continues after the End If statement.

If / Else / End If
Figure 2 shows a modification of the script in Figure 1, which transmits Tx Message 1 if Message Selector is equal to 1, and otherwise sends a default transmission, Default Tx Message.

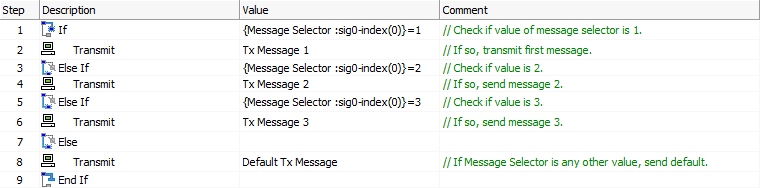
If / Else / Else If / End If
In Figure 3 we have further modified the script to allow multiple values of Message Selector to be tested, with the appropriate message transmitted based on its value. If it carries a value other than the ones we are testing for, the default message is sent.
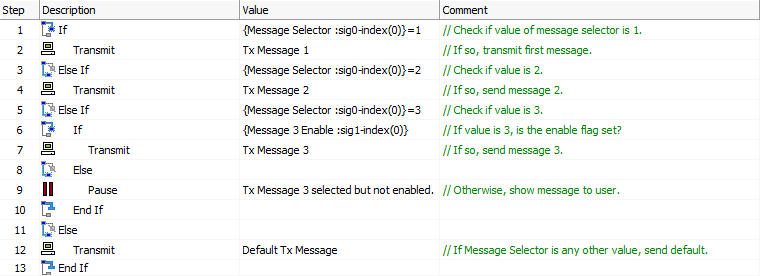
If / Else / Else If / End If with Nested If / Else / End If
In Figure 4 we have added a second construct nested within part of the original structure: Steps 6 through 10 in Figure 4 replace Step 6 in Figure 3. This extra logic activates only if Message Selector's value is 3. If it is, we check another flag called Message 3 Enable; only if that is True do we transmit Tx Message 3. If it is not, we pause and display an error message to the user.
Notice that Vehicle Spy has indented Steps 6 to 10 to make it easier to see that they are nested within the original commands.